FedLeave Application

Follow the instructions on the GitHub README.md to download and install.

For those comfortable with Git, python, and running basic scripts from terminal/command line.

I wanted to experiment in vibe coding. What could it do? Could I use it to actually write a full application?

I was using a set of OpenClaw AI agents to manage my leave slips, and email my Boss and Clerk. So why not let it manage my leave balances? Well, AI stinks at math, so I wanted to make sure that part was deterministic, so I set out to write a command line application to keep the actual ledger.

I wrote, with considerable assistance of AI, a detailed (probably a 20 page) software spec, and blew thru the free tokens that come with VSCode.

To my surprise it worked.

I wrote it in a Unix style with detailed command arguments with standard output (and later JSON output). The idea was that it could make a back-end to either a web interface or a proper GUI, just like I was using it for with my OpenClaw agents.

It started to look useful, so I put it on GitHub.

To continue the thought experiment, I then set out to create a proper cross-platform GUI.

This project isn’t a full time job, it’s a thought experiment. It’s not something that I plan on sinking much more time into. It’s doing what I need it to do. Thus, I’m solely providing it in hopes it is useful as-is.

In the near future, I plan to provide simpler to use installation tools.

Until then, you will have to clone the GitHub repository and run the scripts in the scripts folder to install.

Installing FedLeave from GitHub

FedLeave supports Windows and Debian-based Linux distributions, including Ubuntu. The installation process consists of:

  1. Installing the basic tools needed to download and build FedLeave.
  2. Cloning the FedLeave repository from GitHub.
  3. Running the installation script supplied with the project.
  4. Starting FedLeave Calendar.

You do not need Visual Studio or another programming development environment.


Windows Installation

What You Will Need

Before installing FedLeave on Windows, the computer needs:

  • Windows 10 or Windows 11
  • An internet connection
  • Git
  • Python 3
  • Permission to approve an administrator prompt

The FedLeave installer builds the applications on your computer and then installs them under:

C:\Program Files\fedleave

It also creates a FedLeave Calendar shortcut on the public Desktop and in the Start Menu.

Step 1: Open Windows Terminal

  1. Click the Start button.
  2. Type:
Terminal
  1. Open Terminal or Windows Terminal.

A normal, non-administrator terminal is sufficient at this stage. Windows will request administrator approval later when FedLeave is installed.

If Windows Terminal is unavailable, open Command Prompt instead.

Step 2: Check Whether Git Is Installed

Enter:

git --version

Then press Enter.

If Git is installed, Windows will display a version number similar to:

git version 2.50.0.windows.1

Continue to Step 4.

If Windows reports that git is not recognized, install Git using Step 3.

Step 3: Install Git

In Windows Terminal, enter:

winget install --id Git.Git -e

Press Enter and follow any instructions displayed by Windows.

After installation:

  1. Close Windows Terminal.
  2. Open Windows Terminal again.
  3. Enter:
git --version

Git should now display its version number.

If the winget command is unavailable, install Git for Windows from its official website. Accepting the standard installation selections is normally appropriate.

Step 4: Check Whether Python Is Installed

Enter:

python --version

Press Enter.

If Python is available, Windows should display a version such as:

Python 3.13.5

Any supported Python 3 installation should be reported as Python 3.x.

If Windows reports that Python is not recognized, or opens the Microsoft Store without displaying a version, install Python using Step 5.

Step 5: Install Python

Enter:

winget install --id Python.Python.3.13 -e

Press Enter and follow the installation prompts.

After installation:

  1. Close Windows Terminal.
  2. Open Windows Terminal again.
  3. Enter:
python --version

Confirm that Python reports a version beginning with Python 3.

Step 6: Choose Where to Store the Source Code

The cloned repository is the working copy of the FedLeave source code. It can be stored in your Documents folder.

Enter:

cd /d "%USERPROFILE%\Documents"

Press Enter.

Step 7: Clone the FedLeave Repository

Enter:

git clone https://github.com/joshua-guthrie/fedleave.git

Press Enter.

Git will create a new folder named:

fedleave

The command downloads the source code and installation scripts into that folder.

Step 8: Enter the FedLeave Folder

Enter:

cd fedleave

Press Enter.

The terminal should now be operating inside a location similar to:

C:\Users\YourName\Documents\fedleave

Step 9: Run the Windows Installer

Enter:

scripts\WindowsInstall.bat

Press Enter.

The installer will:

  • Check the required tools.
  • Create an isolated Python build environment.
  • Download the required Python packages.
  • Build the command-line application.
  • Build FedLeave Calendar.
  • Build the analytics and charting applications.
  • Create the packaged Windows application bundle.

The first build requires an internet connection because Python packages must be downloaded.

Step 10: Approve the System Installation

After the build finishes, the script asks whether the completed bundle should be installed.

Enter:

y

Then press Enter.

Windows may display a User Account Control message asking whether the installer may make changes to the computer.

Select:

Yes

The installer places FedLeave under:

C:\Program Files\fedleave

It also creates FedLeave Calendar shortcuts on:

  • The public Desktop
  • The all-users Start Menu

Entering n at the installation question leaves the built application in the repository’s dist folder but does not install it into Program Files.

Step 11: Start FedLeave Calendar

Use either of these methods.

Desktop

Double-click the FedLeave Calendar shortcut on the Desktop.

Start Menu

  1. Open the Start menu.
  2. Search for:
FedLeave Calendar
  1. Select the application.

Step 12: Verify the Command-Line Backend

Open a new Windows Terminal and enter:

"C:\Program Files\fedleave\fedleave\fedleave.exe" --version

FedLeave should display its installed version.

You can also display the available commands with:

"C:\Program Files\fedleave\fedleave\fedleave.exe" --help

Step 13: Complete the Initial FedLeave Setup

When FedLeave Calendar opens for the first time, create or initialize the applicable leave year.

You will need information from your most recent official leave statement, including:

  • The first day of Pay Period 1 for the leave year
  • Your annual-leave accrual rate per pay period
  • Your starting annual-leave balance
  • Your starting sick-leave balance
  • Any starting credit-hour balance
  • Any starting compensatory-time balance
  • Any starting travel-comp balance

Federal annual-leave accrual rates are commonly 4, 6, or 8 hours per pay period, but you should enter the rate shown by your official records.

FedLeave is a personal tracking application. Your agency’s official payroll and timekeeping records remain authoritative.


Linux Installation

Supported Linux Systems

The supplied Linux installer is written and tested for Debian-based distributions, including:

  • Ubuntu
  • Debian
  • Linux Mint and similar Debian-based systems may also work, although they may not be specifically tested

Other Linux distributions may be able to run FedLeave from source, but the supplied installer is intended for systems that use apt-get.

What You Will Need

The computer needs:

  • A supported Debian-based Linux distribution
  • An internet connection
  • A user account allowed to run sudo
  • Git

The installer can install Python automatically when apt-get is available.

Step 1: Open a Terminal

On Ubuntu, press:

Ctrl + Alt + T

A terminal window should open.

You can also open the application menu and select Terminal.

Step 2: Update the Package List

Enter:

sudo apt update

Press Enter.

Linux may ask for your account password.

Type the password and press Enter. The password will not appear on the screen while you type it. This is normal.

Step 3: Install Git

Enter:

sudo apt install -y git

Press Enter.

After installation, confirm that Git works:

git --version

Linux should display a Git version number.

Step 4: Choose Where to Store the Source Code

The repository can be stored in your home folder. Enter:

cd ~

Press Enter.

Step 5: Clone the FedLeave Repository

Enter:

git clone https://github.com/joshua-guthrie/fedleave.git

Press Enter.

Git will create this folder:

~/fedleave

Step 6: Enter the FedLeave Folder

Enter:

cd fedleave

Press Enter.

Step 7: Make the Installer Executable

Linux files must have execution permission before they can be run as programs.

Enter:

chmod +x scripts/LinuxInstall.sh

Press Enter.

This normally needs to be done only once.

Step 8: Run the Linux Installer

Enter:

./scripts/LinuxInstall.sh

Press Enter.

The installer will:

  • Check the operating system and required tools.
  • Offer to install Python if it is missing and apt-get is available.
  • Create an isolated Python build environment.
  • Download the required dependencies.
  • Build the FedLeave applications.
  • Package the applications.
  • Install the application system-wide.

The installer may request your password through sudo during the final system-installation step.

Step 9: Allow the Installation to Finish

Follow the prompts shown by the installer.

The installed command launchers are normally placed in:

/usr/local/bin

FedLeave’s application files are installed separately, while the launchers allow the applications to be started from a terminal without entering their full paths.

Step 10: Verify the Installation

Enter:

fedleave --version

FedLeave should display its installed version.

Then enter:

fedleave --help

This should display the available command-line operations.

Step 11: Start FedLeave Calendar

Enter:

FedLeaveCalendar

Command names on Linux are case-sensitive. The uppercase letters in FedLeaveCalendar must be entered exactly as shown.

Depending on the desktop environment, FedLeave Calendar may also appear in the graphical application menu.

Step 12: Complete the Initial Setup

Create or initialize the appropriate leave year using information from your official leave statement.

You will generally need:

  • Leave-year start date
  • Annual-leave accrual rate
  • Starting annual-leave balance
  • Starting sick-leave balance
  • Starting balances for any other categories you use

FedLeave will create the scheduled annual- and sick-leave accrual entries for the leave year so that current and projected balances can be calculated.


Updating FedLeave Later

The cloned repository can also be used to install a newer version.

Windows Update

Open Windows Terminal and enter:

cd /d "%USERPROFILE%\Documents\fedleave"
git pull
scripts\WindowsInstall.bat

After the new build completes, answer y when asked whether to install it.

Linux Update

Open a terminal and enter:

cd ~/fedleave
git pull
./scripts/LinuxInstall.sh

The installer handles the build and installation workflow.

Before updating, it is prudent to export a FedLeave data backup from the application.


Common Problems

Git Says the Destination Folder Already Exists

This means a fedleave folder is already present.

Do not clone the repository again. Enter the existing folder and update it:

Windows

cd /d "%USERPROFILE%\Documents\fedleave"
git pull

Linux

cd ~/fedleave
git pull

Then run the appropriate installer.

Windows Says git Is Not Recognized

Close and reopen Windows Terminal after installing Git.

If it still fails, restart Windows and try:

git --version

again.

Windows Says python Is Not Recognized

Close and reopen the terminal after installing Python.

Then test:

python --version

If Windows opens the Microsoft Store instead, use the Python installation provided by winget and check the Windows App execution aliases settings for conflicting Python aliases.

Linux Reports Permission Denied

Confirm that execution permission was assigned:

chmod +x scripts/LinuxInstall.sh

Then run:

./scripts/LinuxInstall.sh

Linux Cannot Find FedLeaveCalendar

First confirm that /usr/local/bin is in the command search path:

echo "$PATH"

Then check whether the launcher exists:

ls -l /usr/local/bin/FedLeaveCalendar

Remember that Linux command names are case-sensitive.

The Build Cannot Download Dependencies

Confirm that the computer has internet access and that a firewall, proxy, or organizational security product is not blocking Python package downloads.

Run the installer again after correcting the connection.

Windows Security Software Scans the Build

Python packaging creates several executable files and compiled extension modules. Antivirus software may scan these files while they are being produced.

Allow the scan to complete and run the installer again if a file was temporarily locked. Do not bypass organizational security controls without authorization.


Optional Unattended Installation

These options are intended primarily for automation rather than first-time novice installation.

Windows:

scripts\WindowsInstall.bat --unattended

Linux:

./scripts/LinuxInstall.sh --unattended

A build can also be produced without installing it system-wide.

Windows:

scripts\WindowsInstall.bat --unattended --build-only --verbose

Linux:

./scripts/LinuxInstall.sh --unattended --build-only --verbose

For an ordinary personal installation, use the interactive procedure described earlier.

FedLeave: A Practical Leave and Time Tracker for Federal Employees

Keeping track of federal leave is not especially difficult until several years of records, projected accruals, use-or-lose calculations, credit hours, compensatory time, and payroll reconciliation all become part of the same problem.

FedLeave was developed to put that information in one place.

It is a personal, single-user leave and time-tracking application designed around the way federal employees earn and use leave. It combines a graphical desktop calendar with a command-line back-end, allowing it to work both as an everyday desktop application and as a data source for scripts, dashboards, reports, or other software.

A Calendar Built Around the Federal Pay Period

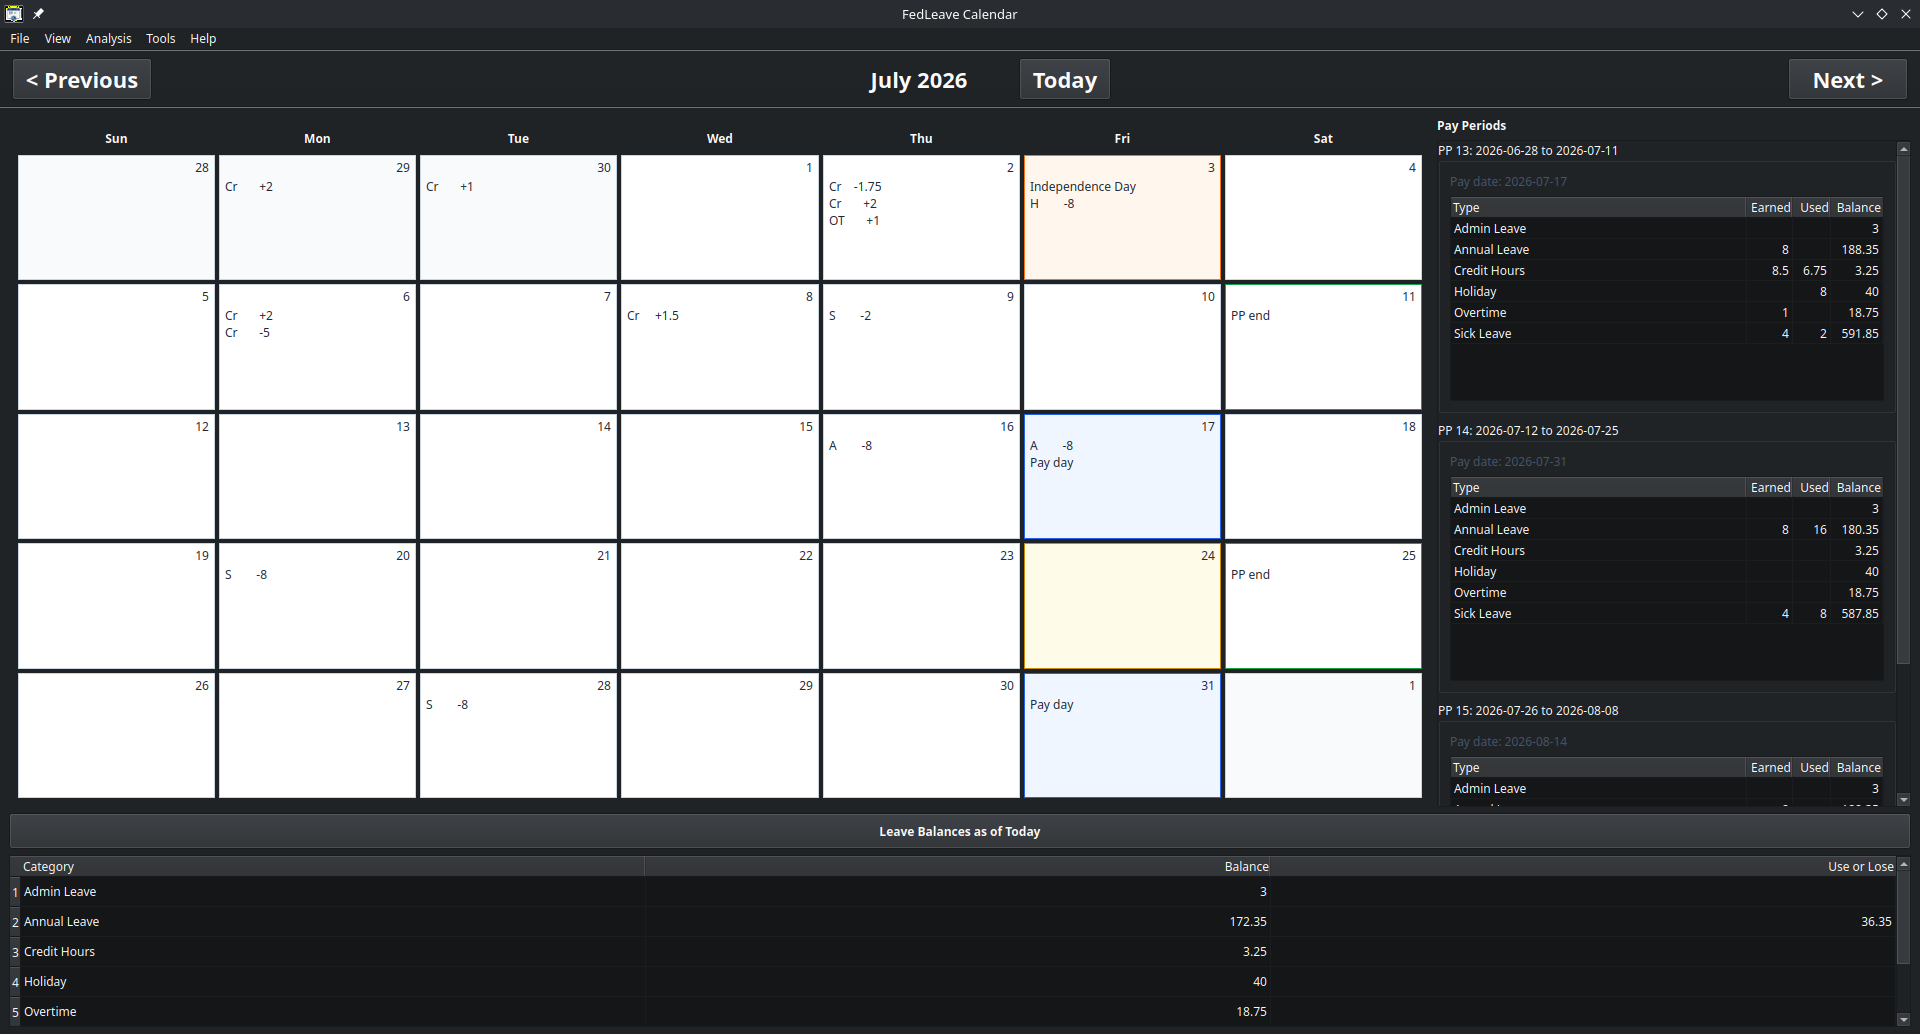
The main FedLeave interface presents leave activity as a monthly calendar rather than as a general-purpose spreadsheet.

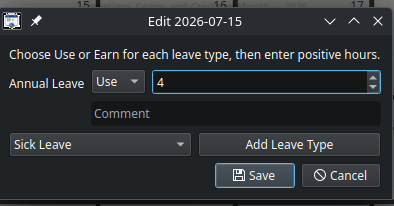
Each month shows recorded leave alongside federal holidays, paydays, pay-period endings, and the current date. Leave can be entered or corrected directly from the calendar, while supporting tables summarize the pay periods that overlap the displayed month.

This provides both views that are normally needed: a day-by-day record of what happened and a pay-period summary of what will affect leave balances or payroll.

The calendar also displays current balances as of today. Empty values are suppressed so the display remains focused on the categories that are actually being used.

Leave Accruals and Projections

FedLeave creates automatic annual- and sick-leave accrual transactions for every pay period in the leave year. Starting balances and the annual-leave accrual rate are established when the year is initialized.

The application can then calculate a balance for today, for an earlier date, or for a future date. Future calculations include scheduled accruals, making it possible to estimate how much leave will be available later in the year.

Accrual rates can also be changed from a specified effective date. This supports employees who move from one annual-leave earning tier to another during the year without requiring the remaining pay periods to be edited manually.

Year-end projections include annual-leave carryover and use-or-lose calculations. Instead of estimating from a current pay statement, the user can see the projected year-end balance based on recorded activity, future accruals, and the configured carryover limit.

More Than Annual and Sick Leave

FedLeave supports the common categories needed for a broader record of federal time and attendance, including:

Annual leave, sick leave, credit hours, compensatory time, travel compensatory time, restored annual leave, religious compensatory time, time-off awards, overtime, military leave, court leave, administrative leave, leave without pay, excused absence, holidays, flex time, and other user-defined activity.

Overtime is treated as worked time rather than as a leave balance. Pay-period reports can therefore show the overtime expected to appear on the corresponding paycheck.

The application can also track individual lots of leave that expire. Comp time, travel comp time, and restored annual leave are supported by default, while time-off-award expiration can be enabled when applicable. The system tracks when each lot was earned, when it expires, and which earned lot is consumed first. Eligible expiration dates can be extended with a recorded reason.

Pay-Period and Monthly Reporting

FedLeave can report activity for a single pay period, every pay period in a leave year, or a complete calendar month.

Pay-period reports show leave earned, leave used, net changes, overtime worked, and ending balances. An optional daily view provides a row for every date in the pay period, including dates with no activity.

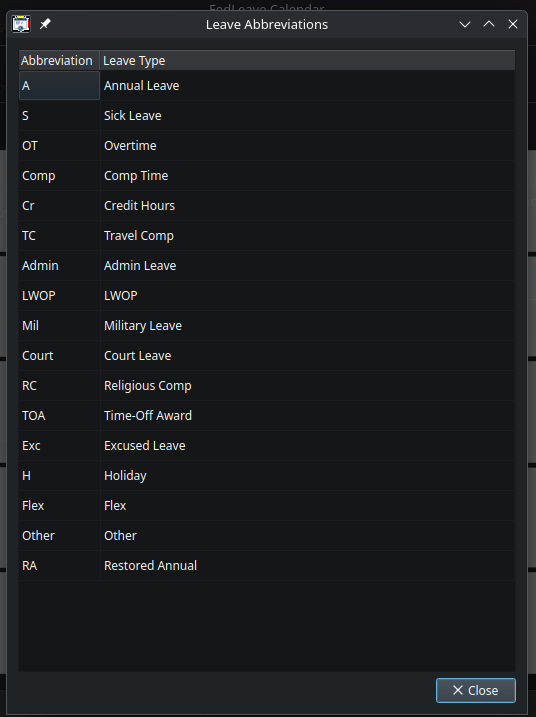
The graphical month report uses the same general layout as the desktop calendar. It includes the calendar, pay-period summaries, current balances, use-or-lose information, and a leave-category abbreviation table in a landscape format suitable for viewing, printing, or saving.

Reports intentionally omit internal transaction identifiers, data-file locations, and other implementation details that are not useful in a printed leave summary.

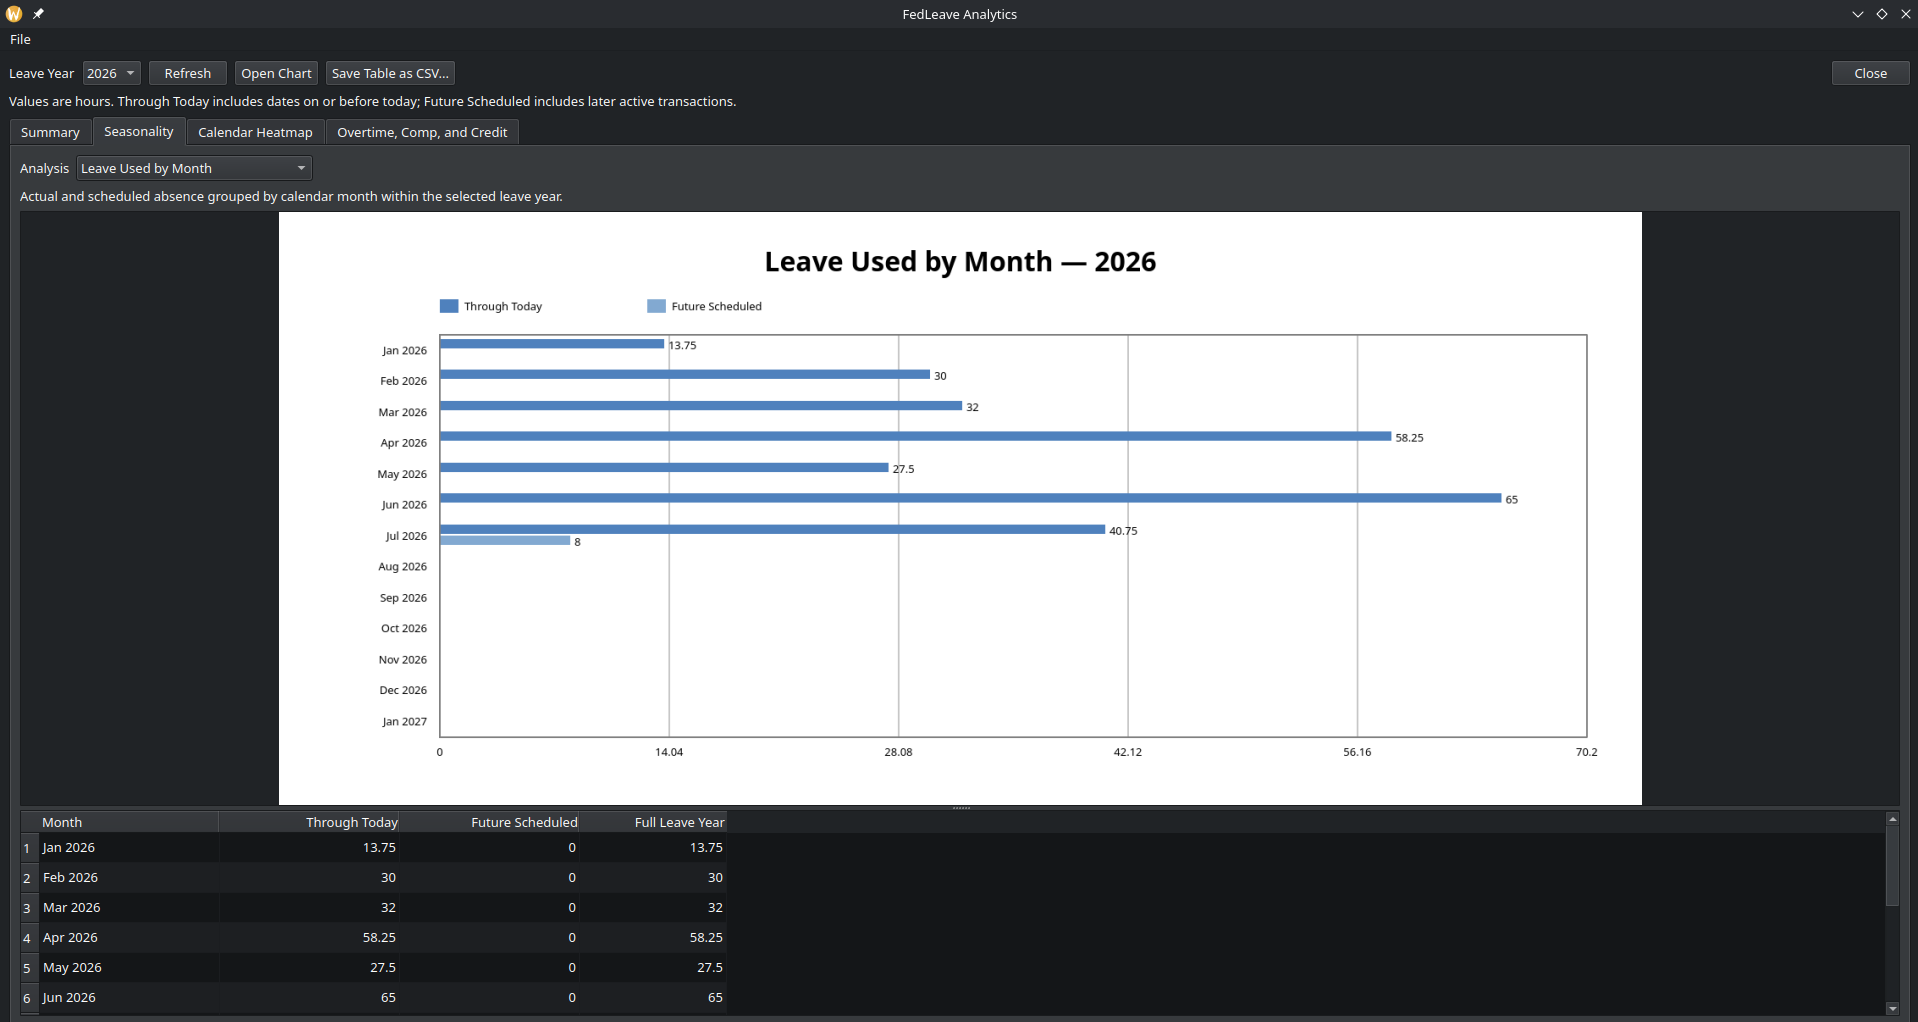
Charts for Current and Previous Years

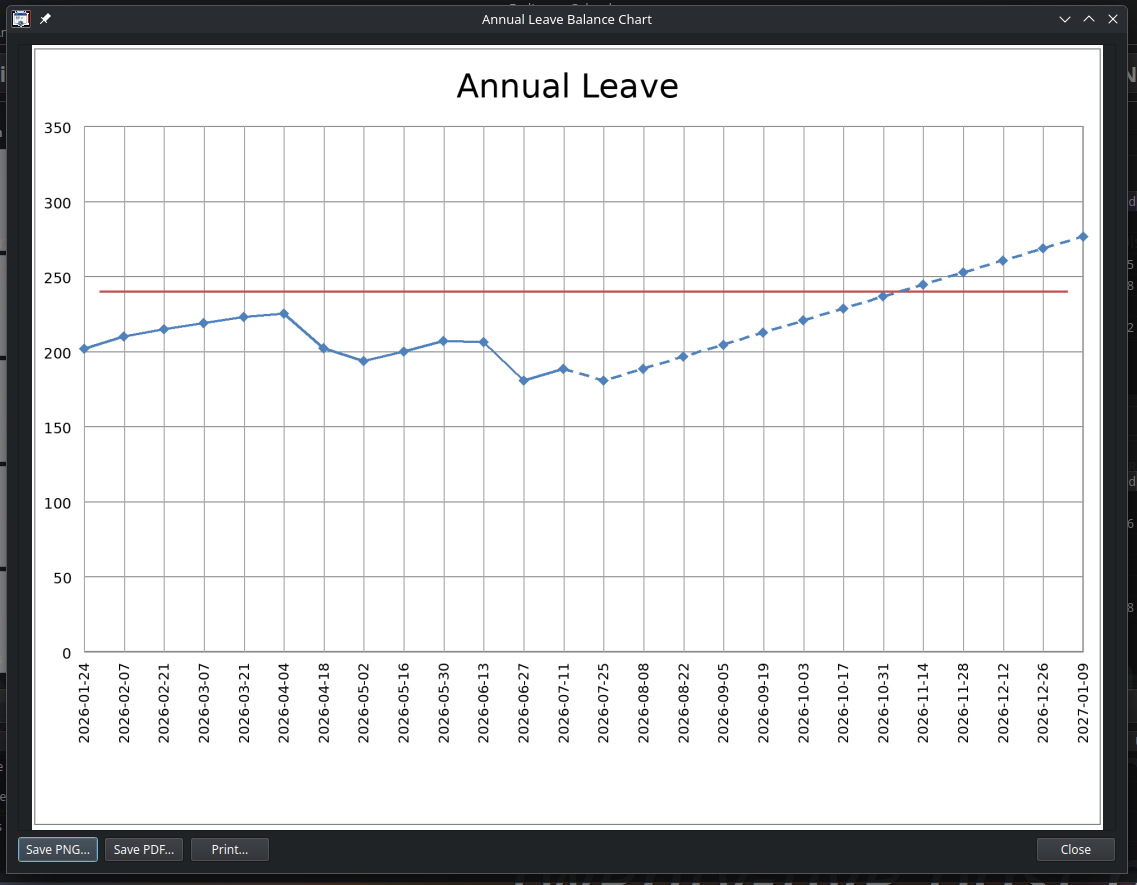
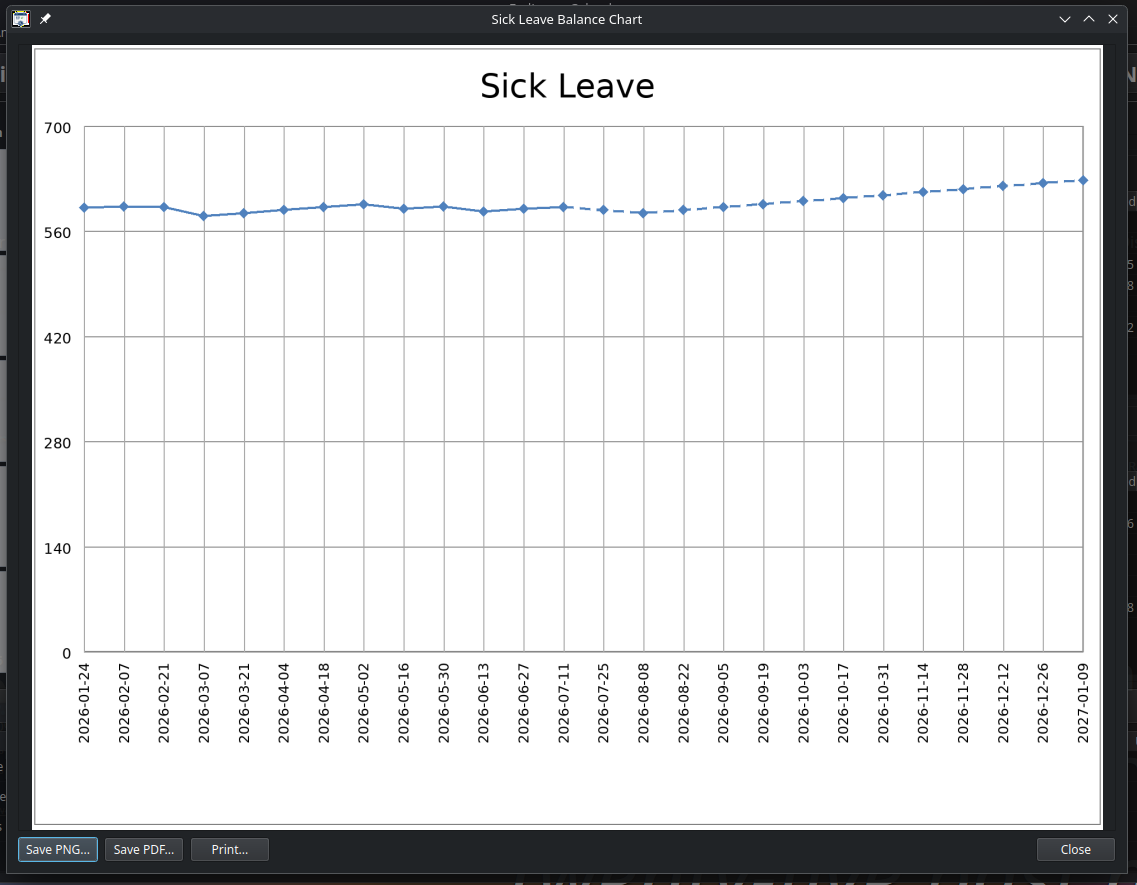
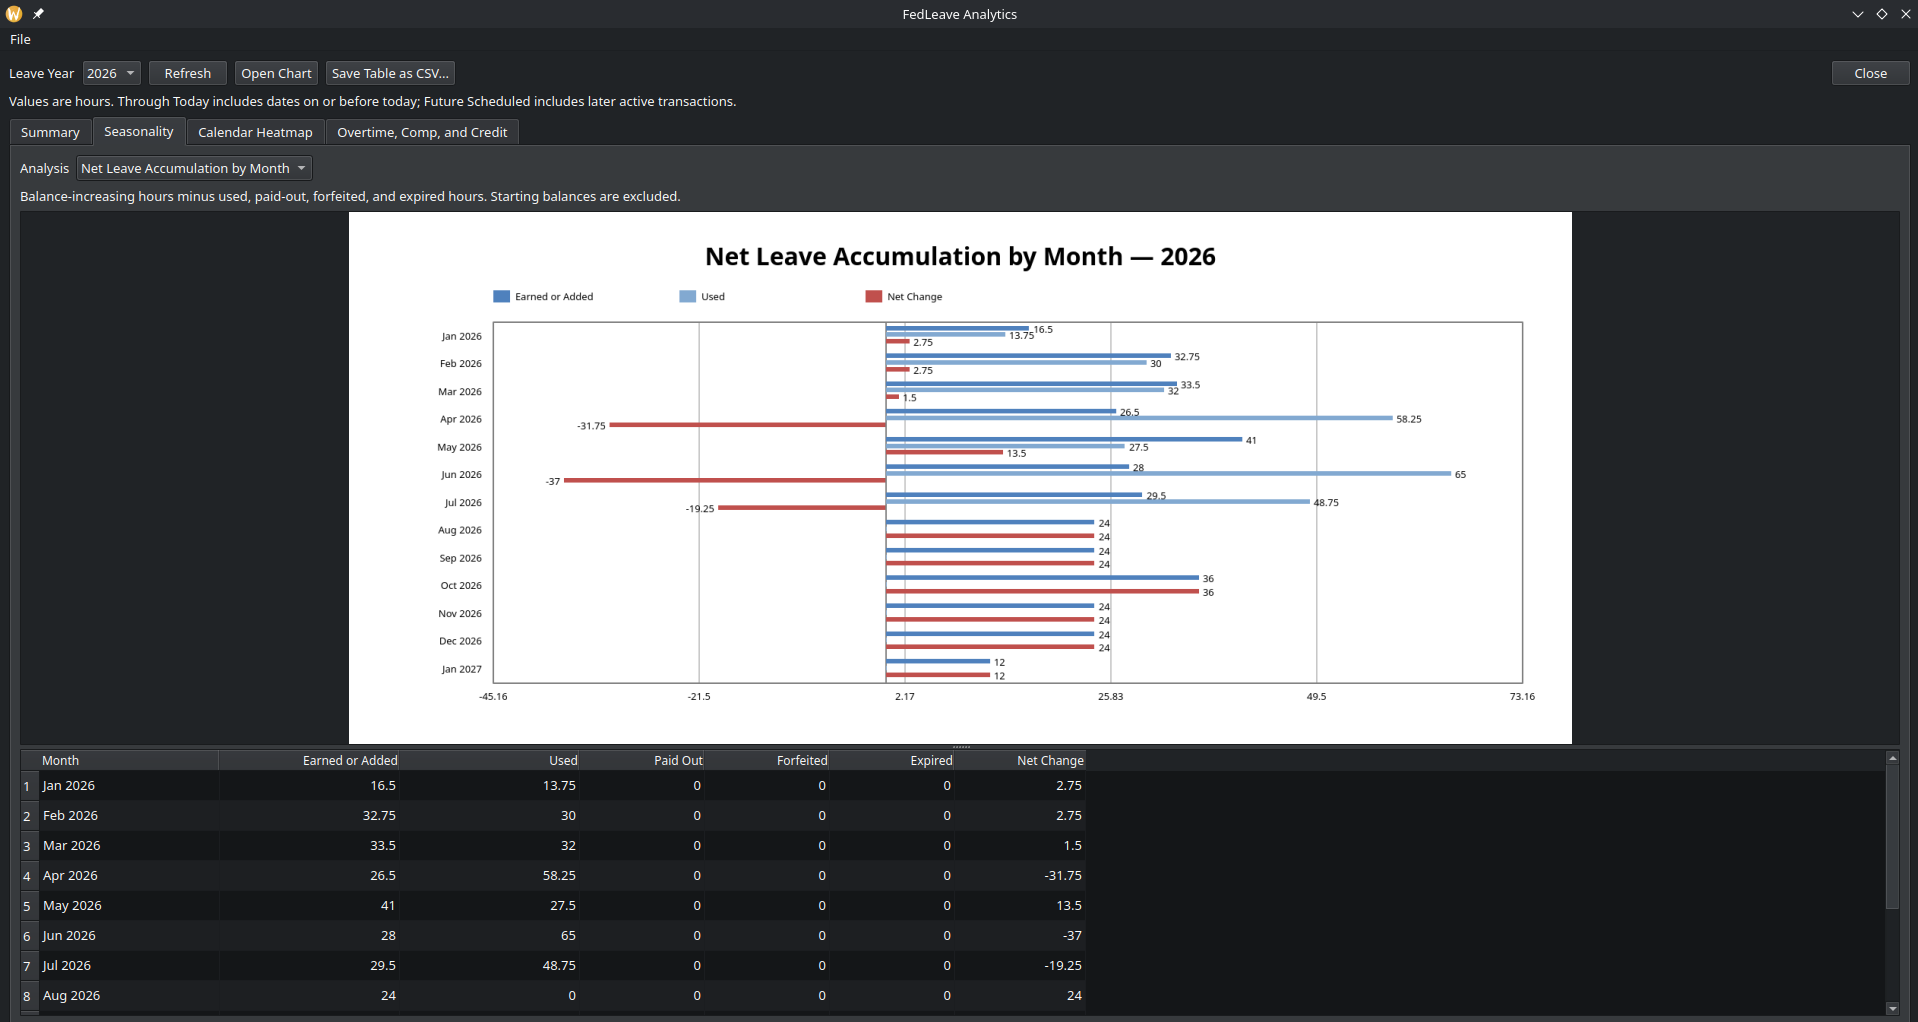
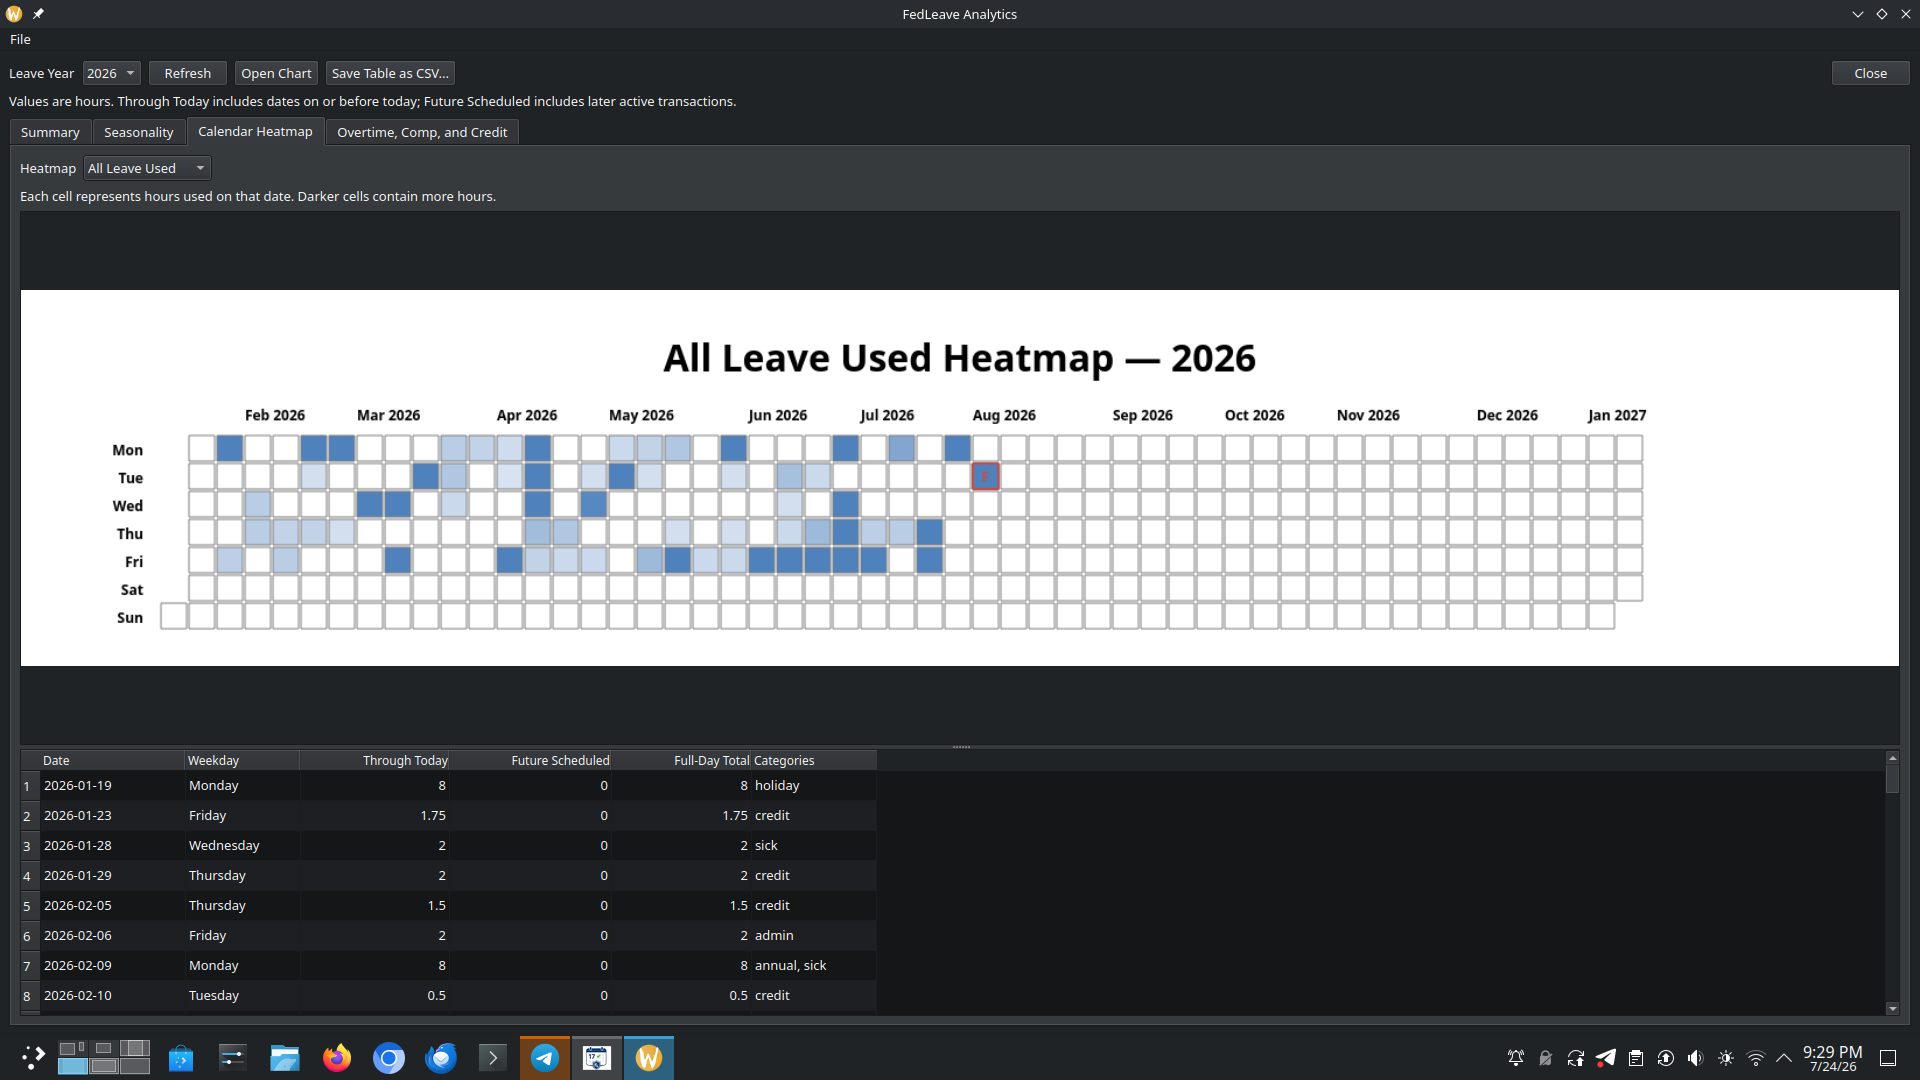
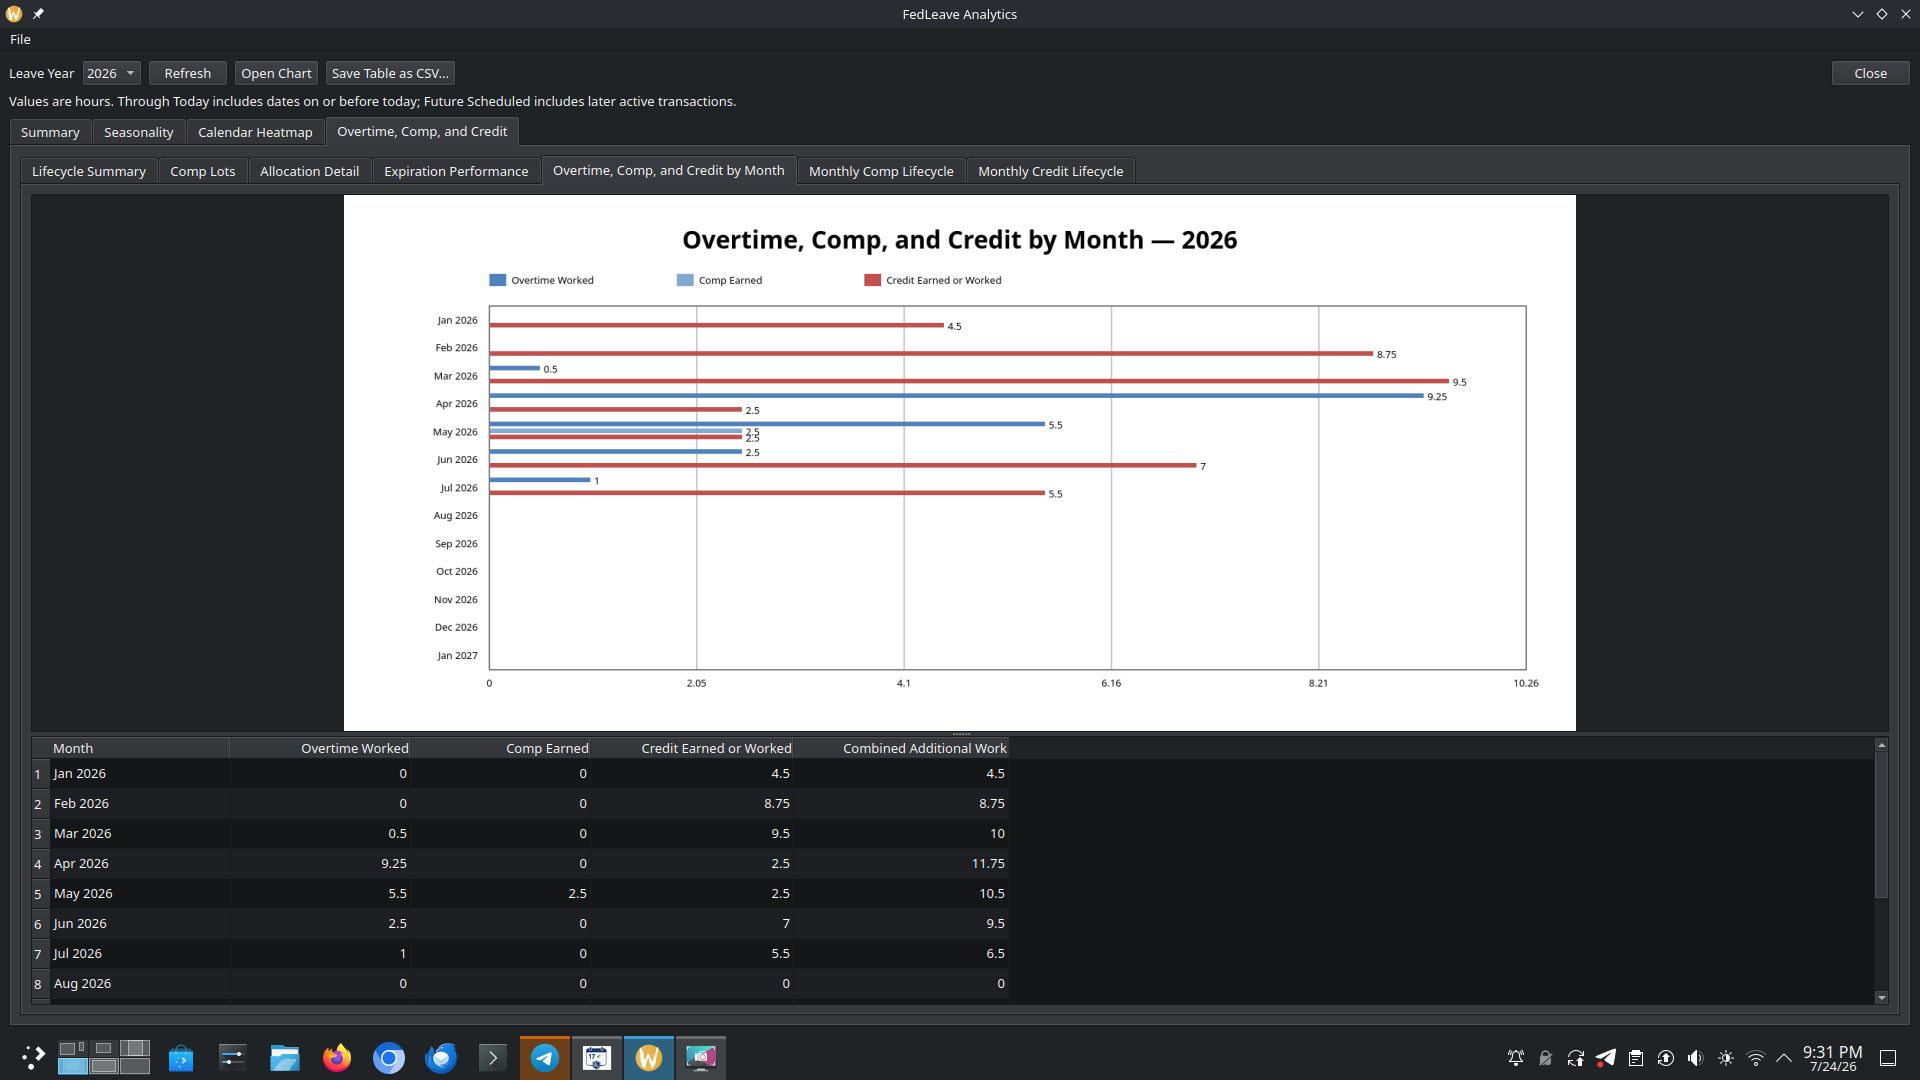
FedLeave includes companion chart applications for viewing how balances change through the leave year.

Separate annual charts are available for annual leave, sick leave, credit hours, compensatory time, travel compensatory time, and time-off awards. The charts distinguish recorded activity through today from future projected activity.

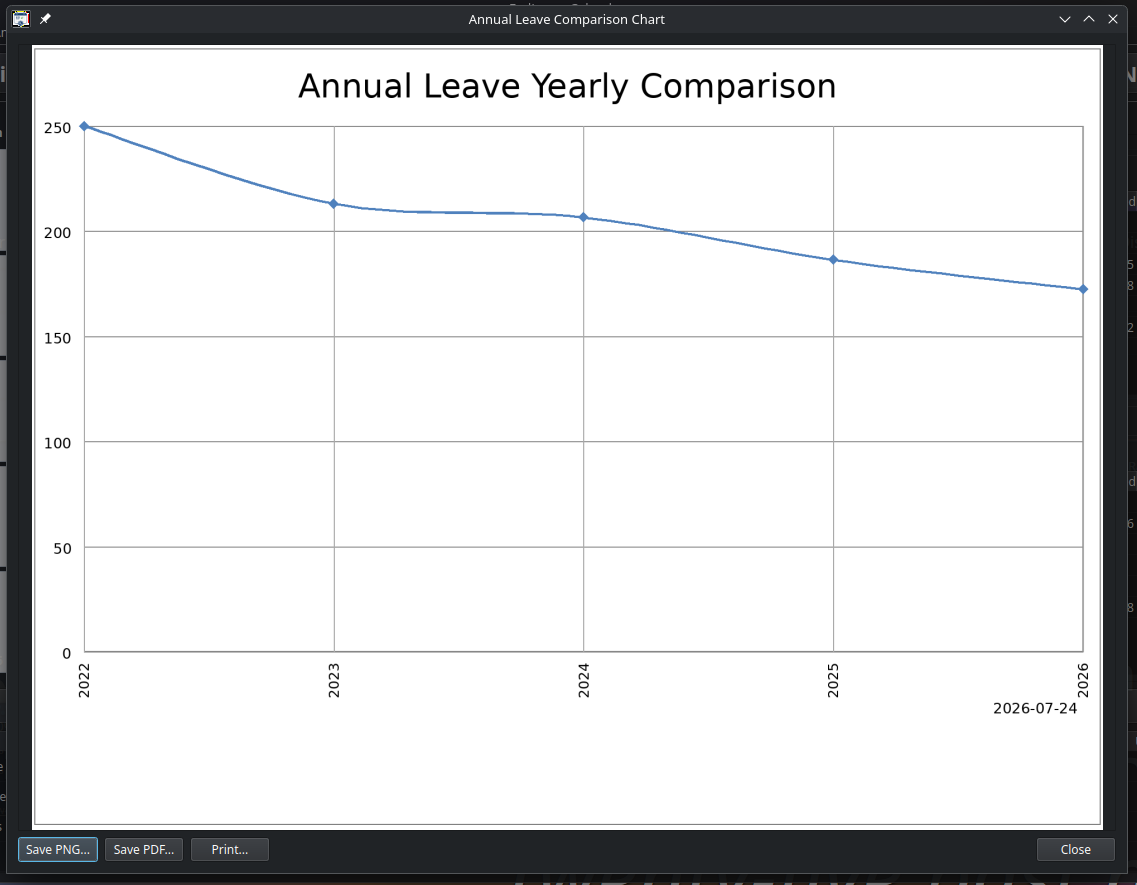
Year-over-year comparison charts provide a longer view. They can compare annual leave, sick leave, credit hours, comp time, travel comp time, time-off awards, and overtime across every leave year for which data is available.

Charts can be opened from the desktop application and saved as PNG or PDF files. They can also be printed directly.

Reconciliation and Corrections

Leave records do not always remain exactly as originally planned. A requested amount may change, a clocking report may contain the authoritative value, or a starting balance may need to be corrected.

FedLeave includes separate workflows for these situations.

A planned transaction can be replaced authoritatively. Payroll or clocking-report information can be reconciled against an existing entry. Individual transactions can be corrected, and a correction can be previewed before it is applied.

A balance can also be forced to an exact value as of a specified date by creating an adjustment. This preserves the calculated ledger while providing a controlled method of bringing the application into agreement with an official balance.

For users at Fleet Readiness Center East, FedLeave can import the WMS HTTP Leave Report. Supported WMS leave codes are mapped to FedLeave categories, and the application asks before replacing matching transactions. Unsupported codes are reported rather than silently assigned to the wrong category.

Local and Portable Data

FedLeave is a local, single-user application. Leave records are stored in JSON files on the user’s computer rather than in a hosted account or shared online service.

The complete data set—including configuration, leave-year records, and cached holiday information—can be exported as a portable archive. That archive can later be imported on the same computer or restored to a different installation.

Existing data is preserved by default during imports. When files are intentionally overwritten, FedLeave creates backups first.

The application also includes validation and normalization tools for checking the stored data. Older leave-year formats are migrated automatically, and compatibility logic can restore missing automatic accrual entries in data created by earlier versions.

A Back-end That Can Be Reused

The desktop calendar does not read or modify the leave files directly. All calculations and edits pass through the FedLeave command-line back-end.

That separation provides a consistent source of truth. The same balance calculation is used whether the request comes from the graphical calendar, a terminal command, a charting utility, or an external application.

Most commands can return either readable text or structured JSON. This makes FedLeave suitable as a back-end for personal dashboards, automated reports, AI agents, and other tools without requiring those tools to understand or manipulate the underlying data files.

Installation and Platform Support

FedLeave includes installation scripts for Windows and Debian- or Ubuntu-based Linux systems.

The scripts handle the main installation lifecycle, including building the application, installing it, repairing an installation, activating a new version, rolling back when necessary, and uninstalling it. An unattended mode is available for automated builds and continuous-integration workflows.

Packaged versions install the command-line back-end, the desktop calendar, the charting tools, and the graphical month-report generator as related applications.

Project Scope

FedLeave is an independent personal software project. It is not an official government timekeeping system, payroll system, or authoritative source of leave balances.

It is intended to supplement official records by giving an employee a clearer personal view of leave activity, projected balances, pay-period totals, and long-term trends. Official payroll and timekeeping records should remain the final authority.

Within that scope, FedLeave provides a practical answer to a recurring problem: understanding not only how much leave is available today, but how that balance was reached, what is expected in the next pay period, and where it is likely to stand at the end of the year.

Documentation for the Command Line/Terminal commands can be found in the README.md file, or on the GitHub Page.